C++ SKIA路径绘制
SkPath类
SkPath结构
去除成员函数之后,我们看到SkPath包括这几个成员,注释中补充了说明
class SK_API SkPath {
    //SkPath中的主要内容,SkAutoTUnref是自解引用,之所以这么设计,是为了复制SkPath时,省去份量较多的点复制(只复制引用)。
    //由一系列线段组成
    SkAutoTUnref<SkPathRef> fPathRef;


    int                 fLastMoveToIndex;
    uint8_t             fFillType;//如下四种类型之一
    /*enum FillType {
        kWinding_FillType,//绘制所有线段包围成的区域
        kEvenOdd_FillType,//绘制被所有线段包围奇数次的区域)
        kInverseWinding_FillType,//kWinding_FillType取反,即绘制不在该区域的点
        kInverseEvenOdd_FillType//第二种type取反
        }*/
    mutable uint8_t     fConvexity;//凹凸性,临时计算
    mutable uint8_t     fDirection;//方向,顺时针/逆时针,临时计算
#ifdef SK_BUILD_FOR_ANDROID
    const SkPath*       fSourcePath;//Hwui中使用,暂不关注
#endif
};
关于 fFillType中 kWinding_FillType和 kEvenOdd_FillType的区别,可看SkPath::contains。这是判断点是否在不规则几何体内的经典代码(),很有参考意义。
class SkPathRef
{
private:
    mutable SkRect      fBounds;//边界,临时计算
    uint8_t             fSegmentMask;//表示这个Path含有哪些种类的形状
    mutable uint8_t     fBoundsIsDirty;//缓存fBounds使用,表示 fBounds是否需要重新计算
    mutable SkBool8     fIsFinite;    // only meaningful if bounds are valid
    mutable SkBool8     fIsOval;


    /*skia不使用stl库而采用的一套容器方案,具体不细说,可看下 SkPath::Iter 的实现*/
    SkPoint*            fPoints; // points to begining of the allocation
    uint8_t*            fVerbs; // points just past the end of the allocation (verbs grow backwards)
    int                 fVerbCnt;
    int                 fPointCnt;
    size_t              fFreeSpace; // redundant but saves computation


    SkTDArray<SkScalar> fConicWeights;
    mutable uint32_t    fGenerationID;
};
SkPath的主要类型
主要类型有
- kMove_Verb:表示需要移动起点
- kLine_Verb:直线
- kQuad_Verb:二次曲线
- kConic_Verb:圆锥曲线
- kCubic_Verb:三次曲线
- kClose_Verb:表闭合到某点
- kDone_Verb:表结束
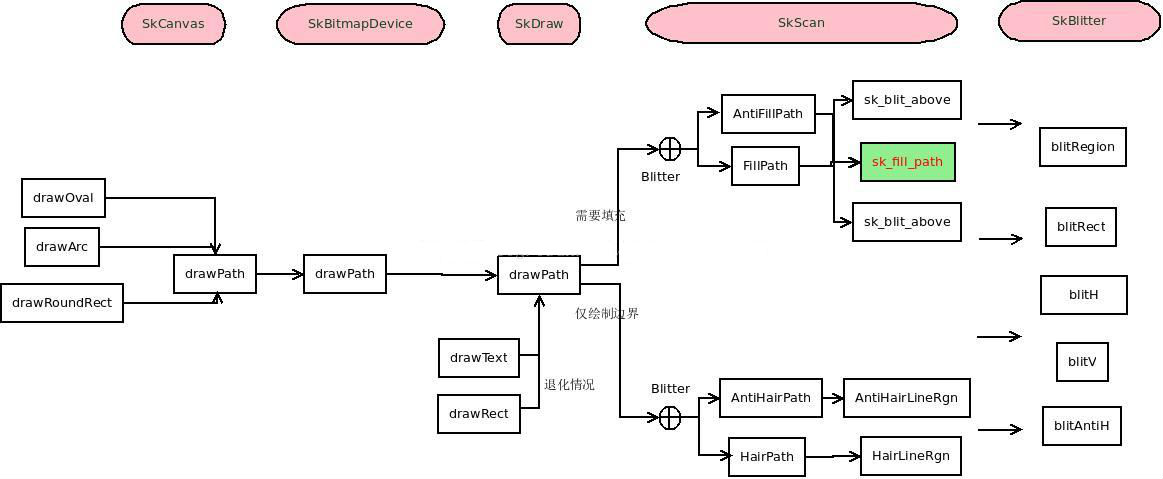
drawPath流程
基本流程

填充算法说明
我们跟进最重要的函数 sk_fill_path
void sk_fill_path(const SkPath& path, const SkIRect* clipRect, SkBlitter* blitter,
                  int start_y, int stop_y, int shiftEdgesUp,
                  const SkRegion& clipRgn) {
    SkASSERT(&path && blitter);

    SkEdgeBuilder   builder;

    int count = builder.build(path, clipRect, shiftEdgesUp);
    SkEdge**    list = builder.edgeList();

    if (count < 2) {
        if (path.isInverseFillType()) {
            /*
             *  Since we are in inverse-fill, our caller has already drawn above
             *  our top (start_y) and will draw below our bottom (stop_y). Thus
             *  we need to restrict our drawing to the intersection of the clip
             *  and those two limits.
             */
            SkIRect rect = clipRgn.getBounds();
            if (rect.fTop < start_y) {
                rect.fTop = start_y;
            }
            if (rect.fBottom > stop_y) {
                rect.fBottom = stop_y;
            }
            if (!rect.isEmpty()) {
                blitter->blitRect(rect.fLeft << shiftEdgesUp,
                                  rect.fTop << shiftEdgesUp,
                                  rect.width() << shiftEdgesUp,
                                  rect.height() << shiftEdgesUp);
            }
        }

        return;
    }

    SkEdge headEdge, tailEdge, *last;
    // this returns the first and last edge after they're sorted into a dlink list
    SkEdge* edge = sort_edges(list, count, &last);

    headEdge.fPrev = NULL;
    headEdge.fNext = edge;
    headEdge.fFirstY = kEDGE_HEAD_Y;
    headEdge.fX = SK_MinS32;
    edge->fPrev = &headEdge;

    tailEdge.fPrev = last;
    tailEdge.fNext = NULL;
    tailEdge.fFirstY = kEDGE_TAIL_Y;
    last->fNext = &tailEdge;

    // now edge is the head of the sorted linklist

    start_y <<= shiftEdgesUp;
    stop_y <<= shiftEdgesUp;
    if (clipRect && start_y < clipRect->fTop) {
        start_y = clipRect->fTop;
    }
    if (clipRect && stop_y > clipRect->fBottom) {
        stop_y = clipRect->fBottom;
    }

    InverseBlitter  ib;
    PrePostProc     proc = NULL;

    if (path.isInverseFillType()) {
        ib.setBlitter(blitter, clipRgn.getBounds(), shiftEdgesUp);
        blitter = &ib;
        proc = PrePostInverseBlitterProc;
    }

    if (path.isConvex() && (NULL == proc)) {
        walk_convex_edges(&headEdge, path.getFillType(), blitter, start_y, stop_y, NULL);
    } else {
        walk_edges(&headEdge, path.getFillType(), blitter, start_y, stop_y, proc);
    }
}
不考虑 Inverse 的情况,主要就是两步:
- 生成一系列边:SkEdge
- 遍历渲染各边所围出来的区域
凸集的渲染比较简单,因为可以保证,任意两条边+闭合线所围成区域一定需要渲染:
- 取初始的两条边,分别为:左和右。
- 渲染左右边+闭合边所围成的区域(一般为三角,当两边平行时取矩形)
- 迭代刷新左右两边(如果是曲线需要刷新多次)
static void walk_convex_edges(SkEdge* prevHead, SkPath::FillType,
                              SkBlitter* blitter, int start_y, int stop_y,
                              PrePostProc proc) {
    validate_sort(prevHead->fNext);

    SkEdge* leftE = prevHead->fNext;
    SkEdge* riteE = leftE->fNext;
    SkEdge* currE = riteE->fNext;

#if 0
    int local_top = leftE->fFirstY;
    SkASSERT(local_top == riteE->fFirstY);
#else
    // our edge choppers for curves can result in the initial edges
    // not lining up, so we take the max.
    int local_top = SkMax32(leftE->fFirstY, riteE->fFirstY);
#endif
    SkASSERT(local_top >= start_y);

    for (;;) {
        SkASSERT(leftE->fFirstY <= stop_y);
        SkASSERT(riteE->fFirstY <= stop_y);

        if (leftE->fX > riteE->fX || (leftE->fX == riteE->fX &&
                                      leftE->fDX > riteE->fDX)) {
            SkTSwap(leftE, riteE);
        }

        int local_bot = SkMin32(leftE->fLastY, riteE->fLastY);
        local_bot = SkMin32(local_bot, stop_y - 1);
        SkASSERT(local_top <= local_bot);

        SkFixed left = leftE->fX;
        SkFixed dLeft = leftE->fDX;
        SkFixed rite = riteE->fX;
        SkFixed dRite = riteE->fDX;
        int count = local_bot - local_top;
        SkASSERT(count >= 0);
        if (0 == (dLeft | dRite)) {
            int L = SkFixedRoundToInt(left);
            int R = SkFixedRoundToInt(rite);
            if (L < R) {
                count += 1;
                blitter->blitRect(L, local_top, R - L, count);
                left += count * dLeft;
                rite += count * dRite;
            }
            local_top = local_bot + 1;
        } else {
            do {
                int L = SkFixedRoundToInt(left);
                int R = SkFixedRoundToInt(rite);
                if (L < R) {
                    blitter->blitH(L, local_top, R - L);
                }
                left += dLeft;
                rite += dRite;
                local_top += 1;
            } while (--count >= 0);
        }

        leftE->fX = left;
        riteE->fX = rite;

        if (update_edge(leftE, local_bot)) {
            if (currE->fFirstY >= stop_y) {
                break;
            }
            leftE = currE;
            currE = currE->fNext;
        }
        if (update_edge(riteE, local_bot)) {
            if (currE->fFirstY >= stop_y) {
                break;
            }
            riteE = currE;
            currE = currE->fNext;
        }

        SkASSERT(leftE);
        SkASSERT(riteE);

        // check our bottom clip
        SkASSERT(local_top == local_bot + 1);
        if (local_top >= stop_y) {
            break;
        }
    }
}
凹集或者判断不了凹凸性就比较复杂,需要一条线一条线去渲染,每次渲染还得判断奇偶性:
static void walk_edges(SkEdge* prevHead, SkPath::FillType fillType,
                       SkBlitter* blitter, int start_y, int stop_y,
                       PrePostProc proc) {
    validate_sort(prevHead->fNext);

    int curr_y = start_y;
    // returns 1 for evenodd, -1 for winding, regardless of inverse-ness
    int windingMask = (fillType & 1) ? 1 : -1;

    for (;;) {
        int     w = 0;
        int     left SK_INIT_TO_AVOID_WARNING;
        bool    in_interval = false;
        SkEdge* currE = prevHead->fNext;
        SkFixed prevX = prevHead->fX;

        validate_edges_for_y(currE, curr_y);

        if (proc) {
            proc(blitter, curr_y, PREPOST_START);    // pre-proc
        }

        while (currE->fFirstY <= curr_y) {
            SkASSERT(currE->fLastY >= curr_y);

            int x = SkFixedRoundToInt(currE->fX);
            w += currE->fWinding;
            if ((w & windingMask) == 0) { // we finished an interval
                SkASSERT(in_interval);
                int width = x - left;
                SkASSERT(width >= 0);
                if (width)
                    blitter->blitH(left, curr_y, width);
                in_interval = false;
            } else if (!in_interval) {
                left = x;
                in_interval = true;
            }

            SkEdge* next = currE->fNext;
            SkFixed newX;

            if (currE->fLastY == curr_y) {    // are we done with this edge?
                if (currE->fCurveCount < 0) {
                    if (((SkCubicEdge*)currE)->updateCubic()) {
                        SkASSERT(currE->fFirstY == curr_y + 1);

                        newX = currE->fX;
                        goto NEXT_X;
                    }
                } else if (currE->fCurveCount > 0) {
                    if (((SkQuadraticEdge*)currE)->updateQuadratic()) {
                        newX = currE->fX;
                        goto NEXT_X;
                    }
                }
                remove_edge(currE);
            } else {
                SkASSERT(currE->fLastY > curr_y);
                newX = currE->fX + currE->fDX;
                currE->fX = newX;
            NEXT_X:
                if (newX < prevX) { // ripple currE backwards until it is x-sorted
                    backward_insert_edge_based_on_x(currE  SkPARAM(curr_y));
                } else {
                    prevX = newX;
                }
            }
            currE = next;
            SkASSERT(currE);
        }

        if (proc) {
            proc(blitter, curr_y, PREPOST_END);    // post-proc
        }

        curr_y += 1;
        if (curr_y >= stop_y) {
            break;
        }
        // now currE points to the first edge with a Yint larger than curr_y
        insert_new_edges(currE, curr_y);
    }
}
总结
drawPath是绘制所有不规则形体的函数,带入Bitmap的Shader,可以制作不规则形体的图片。对于凸集,Skia的渲染主要也是切成三角片后渲染,和OpenGL类似。而对于凹集,则是扫描线了。渲染的实现和绘制图片一样,构建Blitter,调用Blitter的blit函数族渲染。